Abstract
Rationalised Ceramic Assemblies is a project that brings together two materials – wood and ceramics.
The focus is on the implementation of combining two different manufacturing techniques. One of which is forming the material by casting clay and turning it into ceramics, while the other one is deforming it by bending wood. Both techniques are aiming to enhance the structural performance of the material and present an efficient manufacturing method. The research paper is showing a workflow both digital and physical, and it is analysing the feedback given from the results.
Overall the project aims to provide sufficient insight into the exploration of material processing, form generation.
PART 1 – Early experiments & Idea development.
IDEA EXPLORATION
WOOD AS A SUSTAINABLE MATERIAL
Wood was chosen as the primary material for this project as it has excellent acoustic qualities; it is also very relevant material in architecture and present exciting challenges for the designer.
Few of the key features, why wood is so relevant:
- renewable construction material
- load-bearing capacity
- acoustic and moisture insulation
- fire resistance and a long service life
- energy efficient
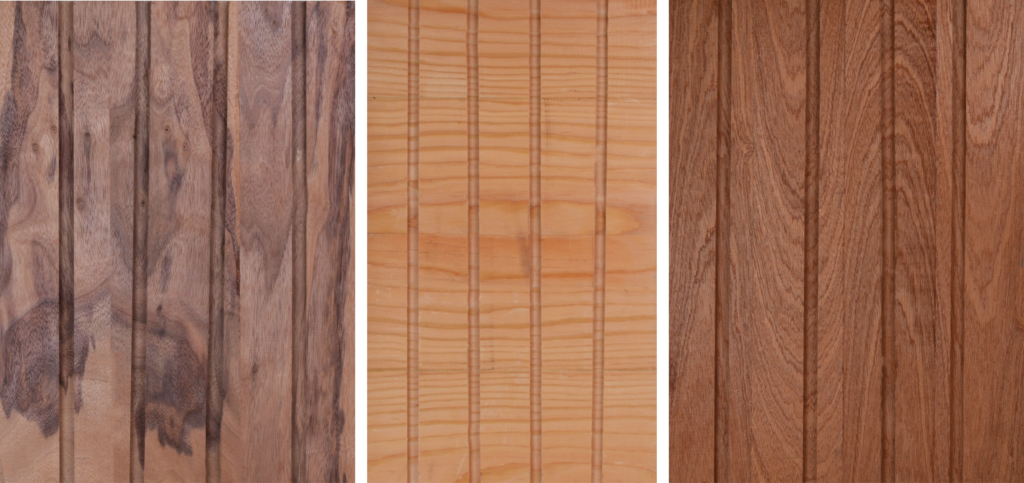
HARDWOOD & SOFTWOOD USED FOR MANUAL TESTS
WALNUT is a fine-grained hardwood that is dense and shock-resistant, according to musicians walnut has a “complex” tone meaning it is a type of wood that gives the most harmonically complex sound.
DOUGLAS FIR is a softwood. And softwood is considered not a great sound mirror. Also, softwood has limitations in terms of machining.
MAHOGANY has a solid punchy tone with low overtone content and good high-end response.
EXPERIMENT: Different types of wood might have a different effect on the sound distribution. The first approach to the project was by testing the differences between two types of hardwood and one softwood on planar surfaces by applying a pattern consisting of straight lines following the direction of the grain, which allowed the sound to scatter between the canals.
RESULT: Because of the small-scale prototype, useful feedback was not received; however, the results detect a small difference in sound levels. Based on that result, the attention then was concentrated onto one type of wood only, which type was chosen based on the manufacturing method. Any hardwood type with similar properties to the selected will deliver sound quality since the first experiment showed they do not have much different sound peculiarity.
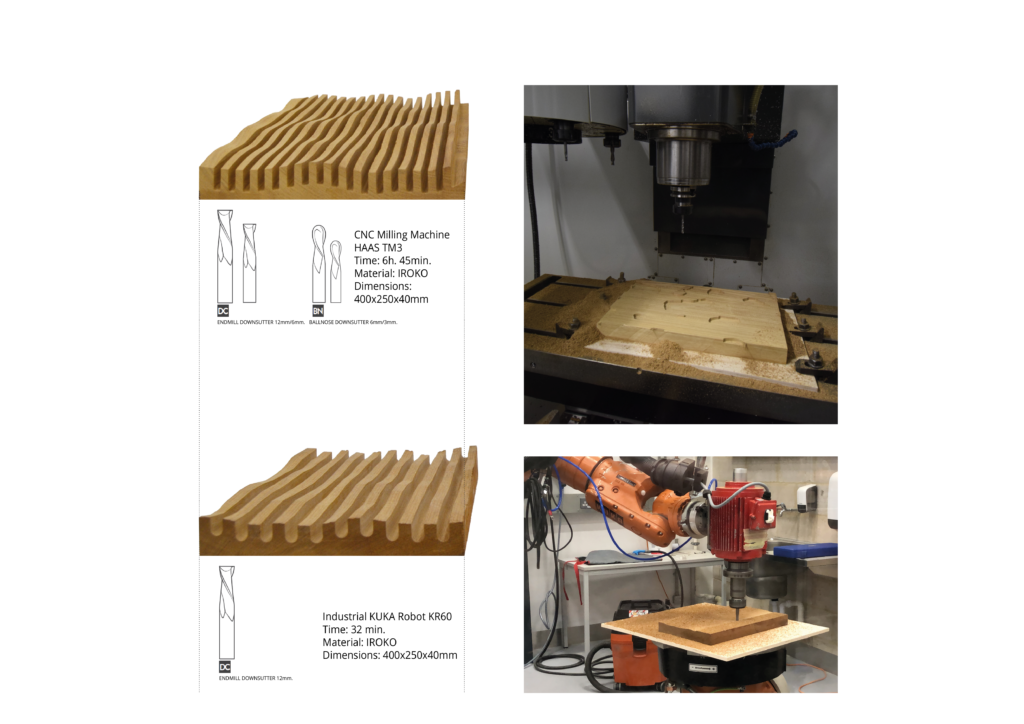
COMPUTER NUMERIC CONTROL MACHINING – MATERIAL BEHAVIOUR AND SURFACE FINISH
The next experiment necessitated the use of a computer numeric control machine (CNC) and a parametric model designed in Grasshopper. The parametric shape is a panel with dimensions of 40cm x 24cm. Digital components from Grasshopper generated a wavy surface with equal ribs going through the whole surface. The idea of the ribs going through the entire surface is to help the sound bounce in between the surface and amplify it rather than transmit it through other surfaces.
The used material for this experiment is Iroko. Iroko is a hardwood tree living up to 500 years. A specific characterisation about Iroko is that the tree itself is very oily and it is disposed to colour change in time. The reason for that is because of the oily finish of the material, the machining quality of the surface turned out to be very smooth, and manual work afterwards was minimised.
A precise toolpath has been generated through Fusion 360 involving multiple tool changes. The machining time of the piece was 7 hours, which is considered a long time for machining a prototype of this size ( 40cmx24cm).


Part 2 – Material Processing and Steam Bending & Cold Pressing

Steam bending works as steaming a piece of wood for a particular time (time depends on the size and thickness of the piece) and then bending it into a pre-made mould or frame. Usually, manufacturers use a steel plate to support the piece and equalise the pressure, which is also helping to avoid cracks on the material.
Ash and oak are the two types of wood selected for the following experiment as they are considered as the best wood types for bending because of the way they grow and dry.
A one-piece frame is designed to help achieve the curvature. The frame visualises a half-cylinder with a diameter of 30cm. The height of the cylinder is considered to fit the piece of wood.
The first experiment was tested with the ash piece. The piece was steamed for 2,5 hours and then bend over the frame with a supportive aluminium plane. (aluminium serves the same purpose as steel for small prototypes)
There were four pieces bent in total over four frames with the same size. The first piece of ash got some cracks, and the possible reason for that would be the less time it got into the steamer. On the other hand, the rest three pieces bent pretty well and came out to align perfectly without much pressure.

Oak (left) and Ash (right) have been chosen as a material and steam bending combined with kerf cutting technique as a method of achieving the curvature. The kerf cutting plays a double role in the design process – once to make the process of steam bending faster by removing some of the material on specific places and second to help the designers to control the pieces into the desired shape by projecting a pattern onto the wooden surface. The wooden pieces range in size and thickness. Few experiments have been made to test the flexibility of the material, meaning that different thicknesses of the material have been tested – 12mm ash, 12mm oak* 14mm ash, 17mm ash.


The other method explored is called cold pressing or bag pressing.
It combines few sheets of thin wood, glued together and put inside a bad with the frame (mould) to take the desired shape. The air is sucked out, and it is pressing the material onto the frame. When the glue is dry, the bag can be open, and the piece should now be a rigid surface with new geometry.
The experiment was done with three plywood sheets – 1.5 mm thick and pressed onto a frame, which was used for steam bending.
PART 3: METHODOLOGY OF MATERIAL PROCESSING & GEOMETRY RATIONALISATION
GEOMETRY RATIONALISATION
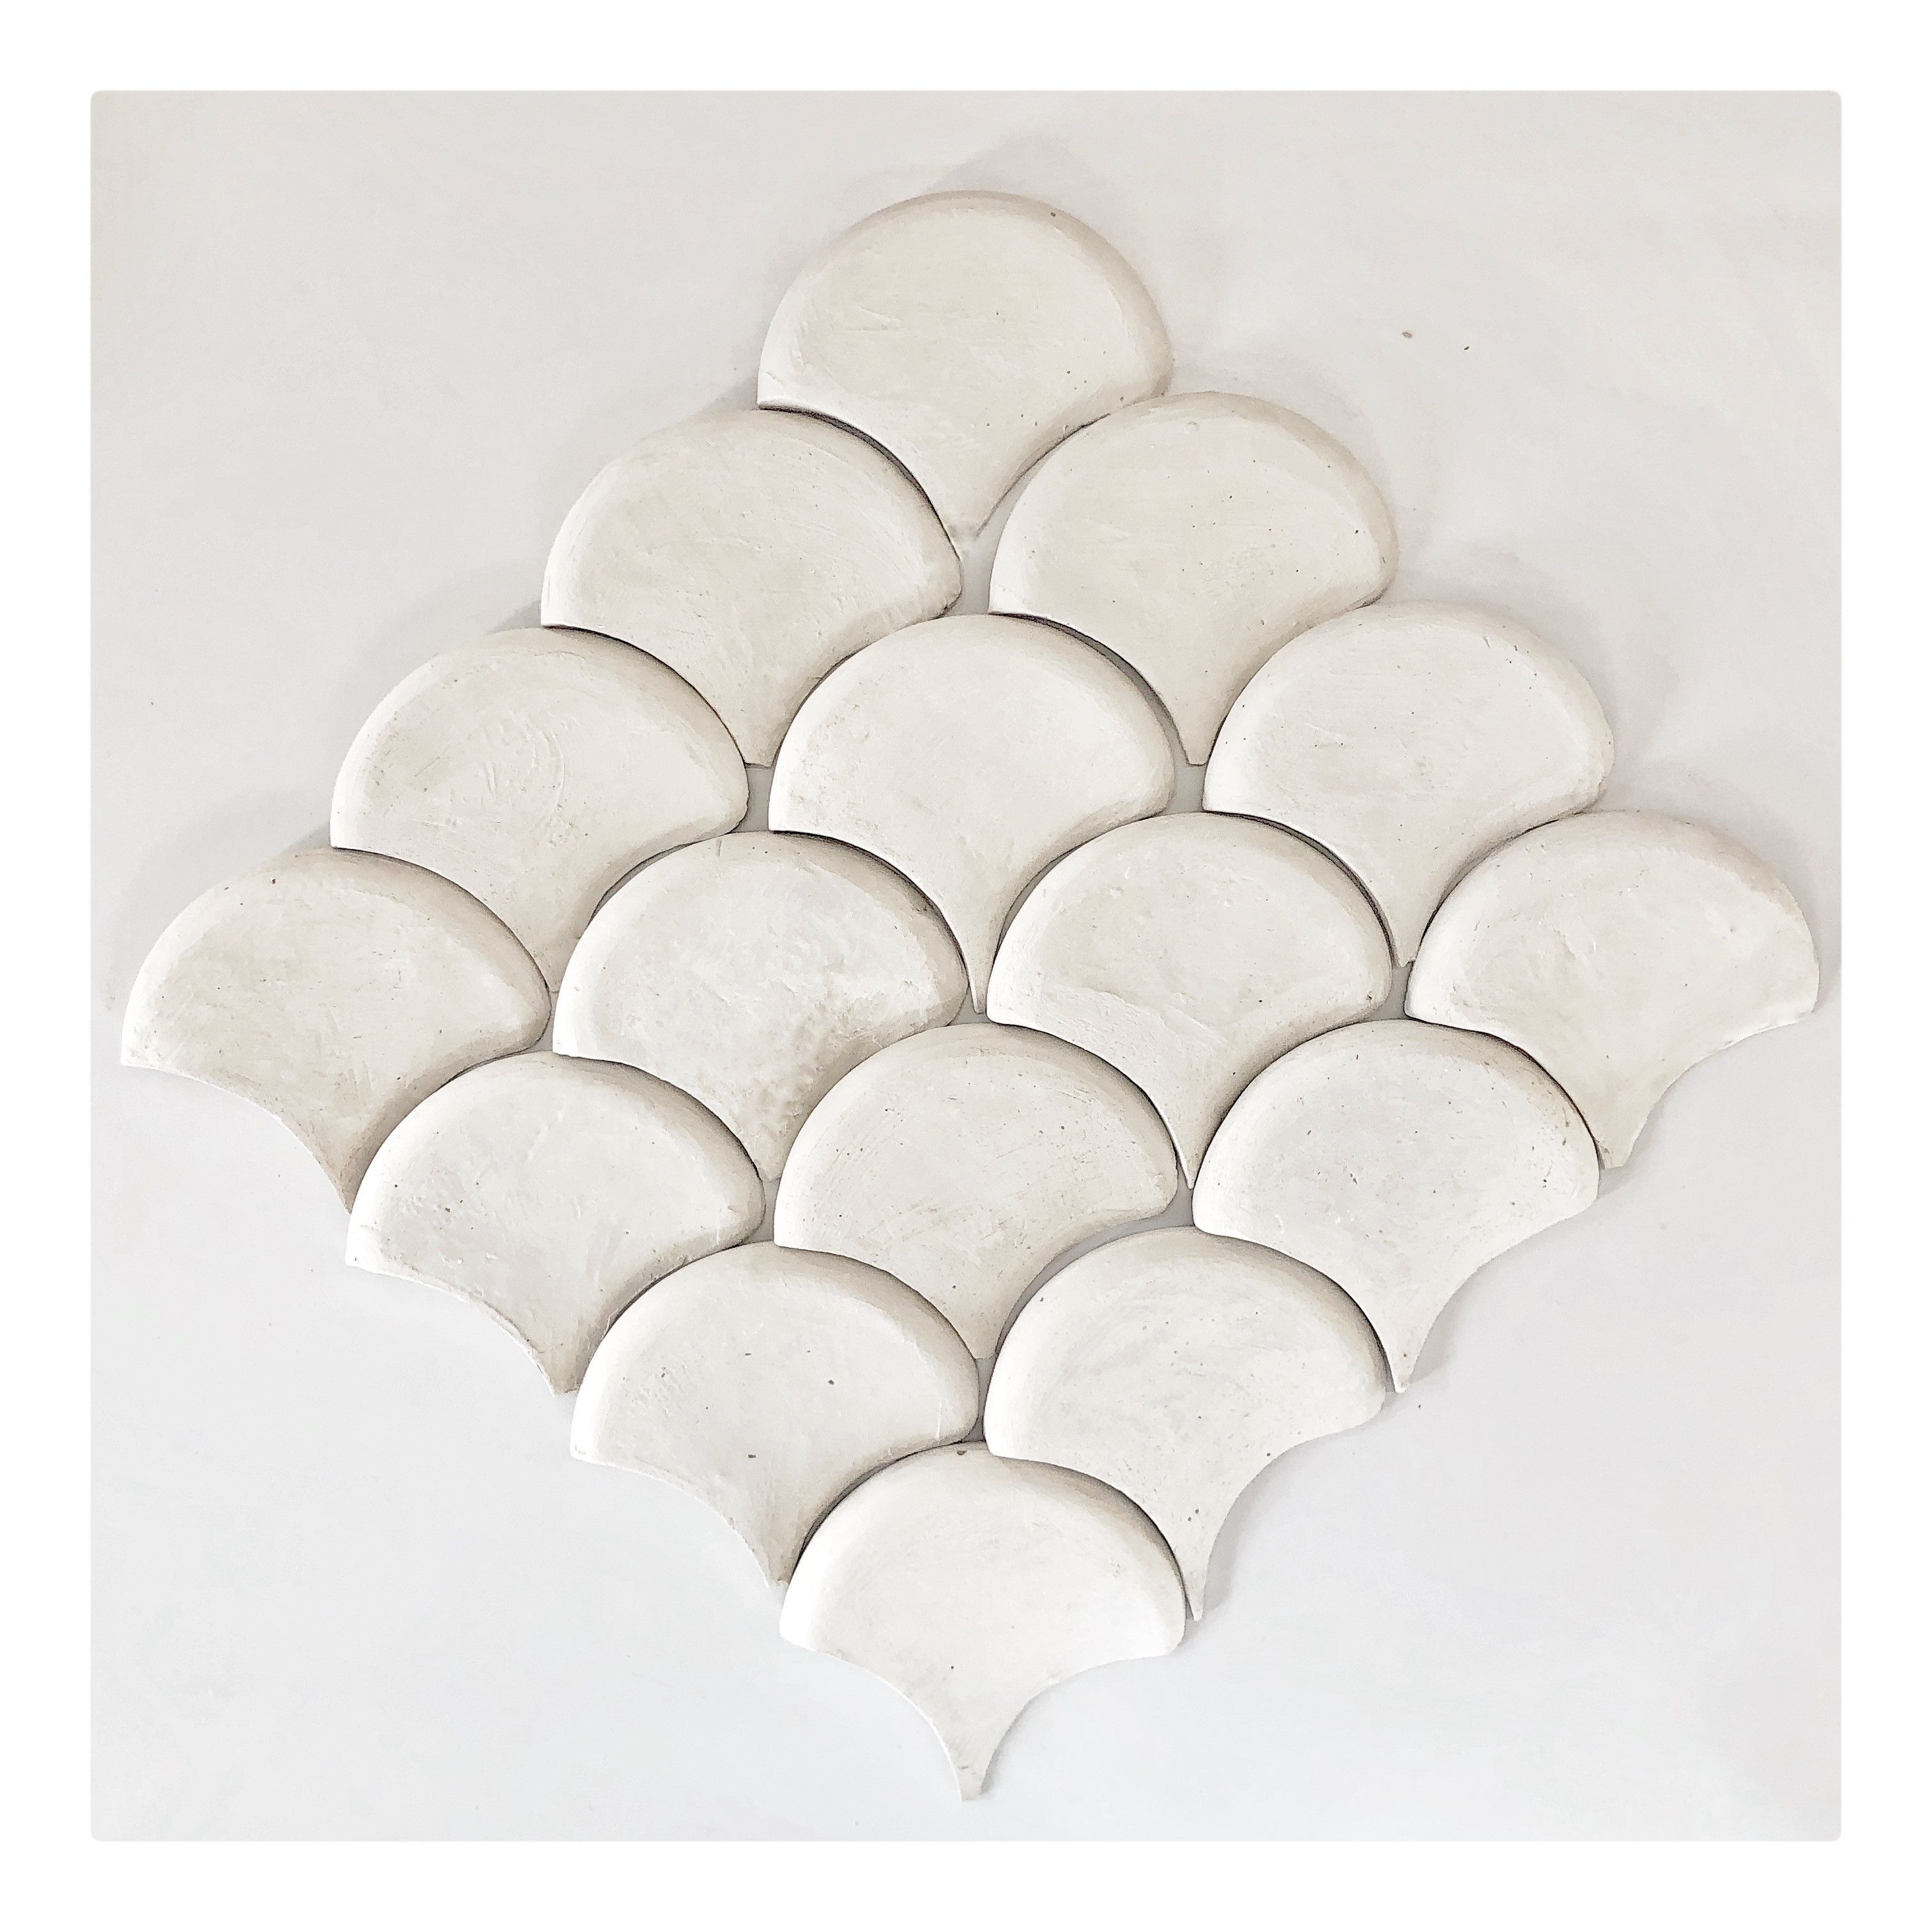
The large scale free-form surfaces raise significant challenges in terms of fabrication in contemporary architecture. As stated by Gavriil (2019), a fundamental problem is the approximation of the panelled surface manufactured with a selected technology for a reasonable cost, while meeting the design intent and desired aesthetic quality. Usually, complex geometries involving curves are manufactured with the help of moulds, so is the presented manufacturing method of this project. However, manufacturing multiple moulds is time-consuming and, in most cases, costly option, because the costs for fabricating the moulds dominate the costs of the actual panels (Gavriil et al., 2019). The arising question is how to rationalise a geometry to panel a complex design intent? The project introduces a workflow shifting back and forth from physical to digital with the idea to get feedback as well as from the digital model so as from the physical prototype. This project presents a simplified geometrical tile allowing the use of one mould only and its reuse to duplicate the shape. The design of the tile is based on three circles intersecting with each other to form the shape of the tile, so each tile can align nicely to another.

CASTING CERAMICS – CHALLENGING MATERIAL – PROCESSING AND BEHAVIOUR
The shape of the tile is designed digitally using parametric software. Once happy with it, it was 3D Printed multiple times. The print has been used to create the plaster moulds, which are very important as they need to be precise in order to cast the ceramic in good shape as much close to the initial design. The more precise the mould is, the more precise the ceramic tiles will be and more likely for them to align.
In order to increase the quantity of production, few identical moulds were designed. One of the advantages of casting ceramics into a plaster mould is that the production of the mould is speedy. All it takes is plaster powder and water that need to be mixed in order to get even consistency.
On the other hand, once the consistency is achieved, it is vital to make sure that there are as little clumps as possible, and there are no air bubbles. If there are air bubbles trapped around the object, they will distort the final shape. The plaster is drying very fast; therefore, it is essential to work fast and steady to get the desired negative shape of the object. The idea of the mould is to absorb the liquid from the clay.


For a prototype big around 106 mm x 106 mm x 20 mm it takes up to two-three hours for the clay to become rigid enough to be taken out of the mould.
The object needs to dry for up to 2 weeks before firing. The drying process is the most prolonged process of consuming much time; therefore, a different method applies in order to quicken the process of drying, without interrupting the quality of the product. Once the product can be taken out of the mould, and it is consistent enough, it can be fired on shallow degree Celsius.
The experiment has been done with firing on 50 Degree Celsius, and the tiles have been fired for an hour. The difference can be spotted when drying the clay changes its colour from dark grey to light grey. After the firing, the tiles are left to dry naturally for 2-3 days more.

The ceramics come with a similar consistency as the one plaster has once it is mixed with water. The hard part of casting ceramics is the actual casting. The clay (ceramics when not fabricated) is a material with unpredictable behaviour when it is drying. Therefore, there might be defects in the structure. These defects are predictable by calculating the ratio of the cation and anion radii, which is on what the structure of the ceramics is based. When drying the clay can change its shape as it is changing its structural properties as well.


BISQUE FIRING & GLAZE FIRING
Bisque firing is the process which turns the clay into ceramics. It is an essential process when casting ceramics and also the one that takes the most energy. Ceramics is impervious to UV degradation; therefore, ceramics can stand very high temperatures. For example, bisque firing is a process where ceramics need to be fired on the very high temperature of 900 Degree Celsius. Many other materials cannot stand such high temperature and that cause deformation on the shape; luckily ceramics are instead building their structural properties while firing and they become very rigid material able to expose high-quality structural properties.
Glazing usually comes after the bisque firing, and it is taking another 15-20 hours of firing inside the kiln, which also wastes much energy. Therefore, this paper experimented with the firing processes by testing the outcome of bisque firing and then glaze firing and comparing the results. The glaze firing schedule requires the product to stay at a temperature of 1240 Degrees Celsius for at least 20 minutes. Until reaching this temperature the first stage of warming up the kiln at about 600 Degrees, Celsius can reach the target temperature of 600 Degrees faster, after the first stage until the target temperature of 1240 Degrees the process must go slower.
Finally, after completing the cycle of at least 20 minutes, the kiln can naturally cool down back to room temperature. If the cycle is completed as described above the product should look equally glazed all over the surface and should have a rigid surface.


DEFORMATION OF THE FORMED MATERIAL
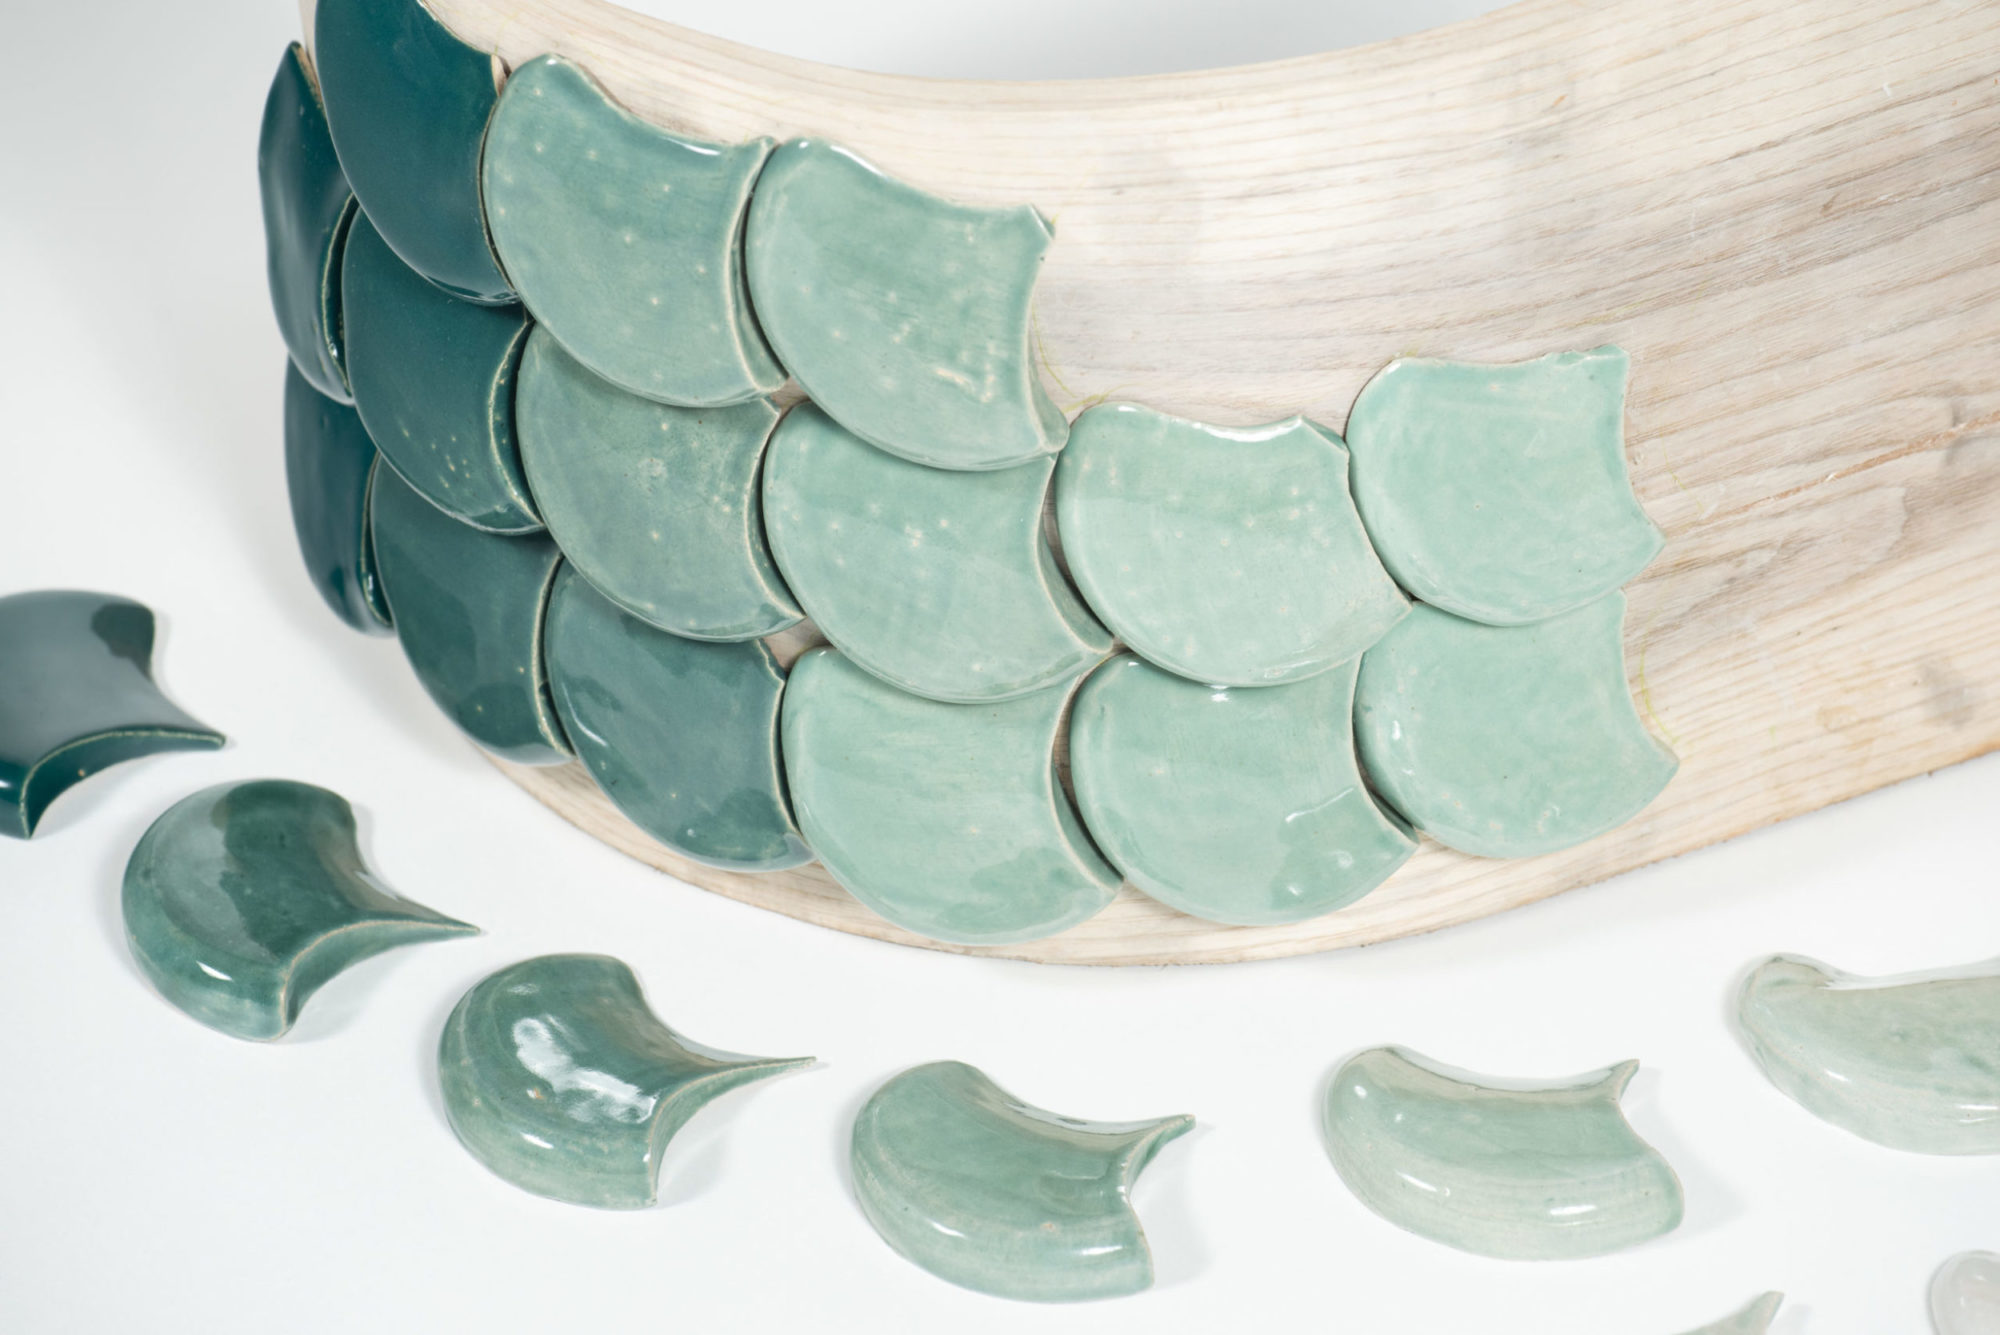
As the approach to this project is focused on curved surfaces, and the goal is to align the tiles on the surface to a maximum precision, another experiment has been applied to the material. The idea is to cast the clay straight so that the moulds can be reused multiple times. After a couple of hours, when the material is stiff enough to get removed from the mould, it is placed on the curved wooden surface with the idea to take the exact curve.
The experiment was tried on a double-curved surface and a single curved surface. When removed from the mould and placed on the surface, the tiles take the shape of the curve and align nicely. However, the clay shrinks while drying. The process of shrinking has caused the tiles differentiations in the alignment.
On the single curved surface, the tiles aligned much closer to one another and the surface of the tiles remained the same as straight, which is considered to be because of the gentle curve.
On the double curved geometry, tiles were hard to align, because the shrinking changed their initial position.
Another problem faced with the curved tiles was that the whole geometry is slumping according to the curvature, (because of the gravity ) while the material is still not entirely rigid. For that reason, the surface of the tile is destroyed and the idea of the uniform pattern not achieved.


PART 4: METHODOLOGY OF MATERIAL PROCESSING & GEOMETRY RATIONALISATION

GLAZING
Glaze Firing is the process that comes after the Bisque Firing. It aims to give the final finish of the ceramic element, whether porous or smooth and glossy. In this case, Some clays can resist high firing schedule, which is the one used for this project. The glazing matches the type of clay. There are many colours and finishes available for high firing (Cone 5).
The glazing aims to give the material a final finish, to enhance the performance of the material as structurally so visually. For that reason, I decided to experiment with the glazes and mix them to see what results I can get. The exciting thing about glazes is that when two colours are mixed, it does not always give the colour you would imagine it will give.
I find this very fascinating because inside the kiln the material is uncontrollable and each tile has its own texture, colour and character, which then allows the designer to play with the result and manipulate it in a way to tell a story.


THE UNCONTROLLABLE EFFECTS
The glaze firing is a process that gives the artist unlimited possibilities in terms of how the glaze coats on the ceramics. Whether brushed, poured or different method giving more details, the artist is setting up certain expectations when glazing. However, in the kiln, the process of how exactly the glaze will slump on the material is entirely uncontrollable, and the results after firing can be both exciting and frustrating.
The aim I was looking for is to get a smooth surface and completely uniform colour when two glazes are mixed. However, some porous finish came out of the kiln on most of the tiles, which is unexplainable so far. It might be the fact that the clay was drying for too long, or just the batch of the glaze is slightly different or old or too newthere are many guesses why it did happen, but nobody dares to give a final reason for it or to suggest a method to improve it.
Changing the firing schedule did not help either; the little spots appeared on both firing schedules.
At first, it looks frustrating to see that the result is not as expected. However, after a while, the defect started to look like an effect. In the end, it led to a delightful satisfaction, because it gives each tile a different finish, different characteristics and makes it stand out from the uniform surface.
The challenge is now to align the tiles and visionary calculate which tile will look useful to another one according to the new, unexpected pattern.

PART 5: 3D GEOMETRY GENERATION & FINAL PROPOSAL
GEOMETRY GENERATION

GEOMETRY GENERATION
The geometry has been generated through Rhino and Grasshopper. The initial curves were drawn in Rhino and then taken into Grasshopper for further manipulations.
The curves are considered to make a geometry with a big gentle curve on one side and a double-curved surface on the other side of the prototype. The reason is that in modern architecture, double-curved surfaces find their way more and more and therefore architects, designers and engineers need to study their performance and get the most of it.
Curvature analysis were applied to the geometry to see where the most stresses are and to consider them when bneding the surface on top of a waffle structure.


PART 6: PHYSICAL MODEL
BUILDING THE PROTOTYPE STEP BY STEP


